Rooms (or Tenantable Units) in Properties will show in one of three status's:
1. Occupied: The room has an active Tenancy
2. Vacant Tenantable: The room is Vacant, it is Tenantable and it has the ability to have a Tenancy immediately.
3. Vacant Untenantable: The room is Vacant but it is Untenantable and it cannot have a Tenancy in it due to maintenance, cleaning, upgrade requirements, etc.
This solution details:
- Viewing the Room Status on a Property
- How does the Room Status Change?
- Manually changing the Room Status from Vacant Tenantable to Vacant Untenantable
- Manually changing the Room Status from Vacant Untenantable to Vacant Tenantable
- Amending Historical Vacant Untenantable Periods
- Viewing all Room Statuses
Viewing the Room Status on a Property
The status of each room shows on the property screen, in the Rooms section:

More detail can be seen by double clicking on row of the the room (number, type or status) of the Room you want to view:

How does the Room Status Change?
There are 3 ways a room status can be changed in Chintaro:
1. When a tenancy is created, the room will automatically change to Occupied
2. When a tenancy is vacated, the room can be changed to either Vacant Tenantable, or Vacant Untenantable
3. Manually, if it is either Vacant Tenantable and needs to be made Untenantable, or vice-versa
The status of Rooms needs to be tracked for reporting purposes to show Occupancy Rates (the percentage of time the Room was occupied or vacant). Vacant Untenantable Rooms are Rooms that cannot have a Tenancy for reasons out of your control, and will not show as a Vacant Rooms in reports.
Manually changing the Room Status from Vacant Tenantable to Vacant Untenantable
To change the Room Status in a Property, start in the Property Screen.
In the property screen, double click the row of the Room you want to change the status for:

The Room Details screen opens. Click the Vacant Untenantable button at the top of the Room Details screen

Enter the date the Room became Vacant Untenantable from in the Will be Unavailable From field:
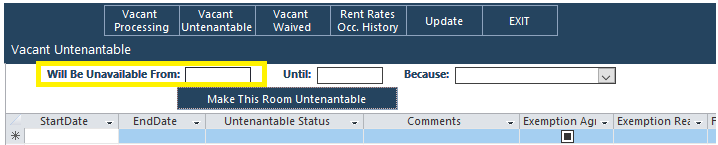
Once entered, click the Make This Room Untenantable button:

The Status on the left hand side will change and a message appears to confirm the change to Vacant Untenantable.
Manually changing the Room Status from Vacant Untenantable to Vacant Tenantable
To change the Room Status in a Property, start in the Property Screen.
In the property screen, double click the row of the Room you want to change the status for:

The Room Details screen opens on the Vacant Untenantable screen:

Enter the date the Room became available to have a Tenancy again in the Until field end the reason in the Because field:

After entering, click the Restore This Room to Vacant Tenantable button:

The Room is now restored back to Vacant Tenantable and is able to have a Tenancy.
Amending Historical Vacant Untenantable Periods

Note: Be sure to rerun the occupancy calculation for any periods that you've been changing room status periods in: Running the Occupancy Calculation (to calculate Occupancy/Vacancy of Rooms)
Viewing all Room Statuses
The Manage Rooms screen is used to look at all Rooms. Click here for a detailed solution about this screen.
Was this article helpful?
That’s Great!
Thank you for your feedback
Sorry! We couldn't be helpful
Thank you for your feedback
Feedback sent
We appreciate your effort and will try to fix the article