This solution covers:
- Creating an Inventory Item to be cloned
- Selecting the Item to clone
- Cloning Inventory Item(s) to one property
- Cloning an Inventory Item to more than one Property
- Adding the specifics of the item to each copied item
Creating an Inventory Item to be cloned
A blank Inventory Item screen will open. Enter only the information that is generic about the item and do not put in specific information (EG Serial Number) about the item - this will be added later once the item has been cloned.
Click Exit when complete.
Selecting the Item to clone
To view the Clone Inventory Items screen, click the Home button, then click Properties, and Clone Inventory Items:
First, select the property that contains the Inventory Item you will be cloning from in the Source Property drop down list.
Once selected, a list of Inventory Items for the selected property will appear in the box below, showing the Item Name and its location within the Property. Select the Item or Items you want to copy by clicking on them. NOTE: This is a multi select box where you can select more than 1 item, and selected Items will appear black:

If you have accidentally selected the wrong item, click it again to remove the highlighting. You can also choose to Select All or Select None
Cloning Inventory Item(s) to one property
Once you have selected the Inventory Item you want to clone, you have the option to select a Destination Property if you want to clone the item to one particular property. When selecting a Destination property, the Inventory Items that are currently in that Property will show in the box below:

When you have selected an Inventory Item to clone, and a Destination property, click Create a copy of the selected Inventory Items to this property ONLY:

The cloned Item(s) will now appear in the Destination Property List and in the property Inventory section.

Cloning an Inventory Item to more than one Property
Once selected, a list of Inventory Items for the selected property will appear in the box below, showing the Item Name and its location within the Property. Select the Item or Items you want to copy by clicking on them. NOTE: This is a multi select box where you can select more than 1 item, and selected Items will appear black:


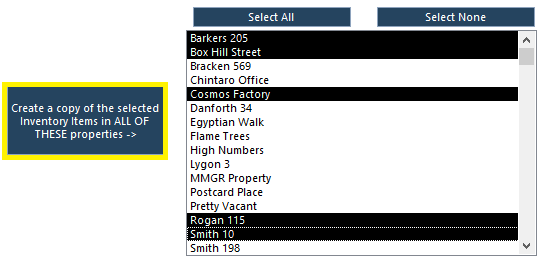
You can individually click on the properties one by one, or click Select All if you want to copy the selected items to all properties. Click Create a copy of the selected Inventory Items in ALL OF THESE properties:

You will get a message to advise you the Inventory Item was successfully clones to the number of Properties you selected.
Adding the specifics of the item to each copied item
If you have cloned an Inventory Item to multiple other Properties, you may need to go in to each property and add the information specific to that item, EG Serial Number, Replacement Date, Replacement Cost, etc.
All fields can be found in the Property > Inventory screen:
Was this article helpful?
That’s Great!
Thank you for your feedback
Sorry! We couldn't be helpful
Thank you for your feedback
Feedback sent
We appreciate your effort and will try to fix the article


