The Client Notes section in Chintaro is used as a historical record of the interactions between your Organisation and your Client. Notes can be entered manually and performing some functions in Chintaro will add notes automatically (EG Change of Address, when Vacating, SMS or Email Sent).
- Adding a new Note to a Client Screen
- Pinning a Note to the top of the Client Notes screen (Sticky Notes)
- Removing a Sticky/Pinned Note
- Removing/Deleting a Note from a Client's screen
- Transferring a Note to another Client
- Viewing the Notes sent Client Notes Buffer Account
- Transferring a Note from the Buffer Account back to the Client Screen
- Copying all Notes from one Client to another
- Deleting Notes copied by accident to another Client
- Printing the Note History of a Client
- Viewing all Client Notes created within Chintaro
- Filtering the Client Notes screen to report on different Note Types
Adding a new Note to a Client Screen
To add a new note to a Client screen, from the Home Screen > Clients > Manage Clients > double click the row of the Client you wish to add the note to, then click the Add Note button in the Notes section on the bottom right of the screen.
An empty Property Note pop up will appear, where you can enter the following:
| Field | Screenshot | Description |
| Note Date |  | Will default to today’s date. |
| Note Type |  | A drop down list where you can group your notes in to categories (EG Maintenance, Letter etc.) You will be able to filter and sort Notes by the Note Type. The Note Type drop down list is customisable by your System Administrator. |
| Note Title |  | A short description of the Note |
| Note Body |  | Add the full description of the Note in the Note Body. You can add default text by adding rows to the 'Message Defaults' reference table (Home > System Maintenance > Reference Tables > Message Defaults). NOTE: For a new line in the Note Body, you must hold down <CRTL> + K. Simply pressing <ENTER> will move the cursor to the next field. When you have finished entering the Note information, click the Add button to save the Note. Notes will appear in the Notes Section of the Client record in descending date order. |
| Add/Edit Link |  | Used to add Related Links on your network to specific Notes (Hold down <CTRL> + K to add new Link). |
| Time Spent in Minutes |  | Used to record how much time is spent on a task. Enter in Minutes. |
| Sticky? |  | If you have a note (or multiple notes) that are particularly important and you would like to pin them to the top of the Notes list, you can make them a 'Sticky' note. When a Note is 'Sticky', it will appear at the top of the list, by Note Date. Sticky Note changes are audited on the Note screen (Date Last Changed, Last Updated By). |
To add the note to the property, click Add Note.
Pinning a Note to the top of the Client Notes screen (Sticky Notes)
If you have a note (or multiple notes) that are particularly important and you would like to pin them to the top of the Notes list, you can make them a 'Sticky' note. When a Note is 'Sticky', it will appear at the top of the list, by Note Date. These Notes will appear at the top of the list and be seen first, each time a user logs in to the Client's screen:

To pin a Note to make it a Sticky Note, either tick the 'Sticky' box for the Note in the Client screen or open the Note and tick the 'Sticky?' box:

Sticky Note changes are audited on the Note screen (Date Last Changed, Last Updated By).
Removing a Sticky/Pinned Note
To remove the pinning of a Note, untick the Sticky? box, either on the Client Notes section of the Client Screen, or open the note and untick the 'Sticky?' box. When unpinning the note, it will return to where it belongs in the date order of all other notes (descending default).
Removing/Deleting a Note from a Client's screen

The Note will be removed from the Client Record, but can be viewed in the Client Notes Buffer by your Chintaro System Administrator.
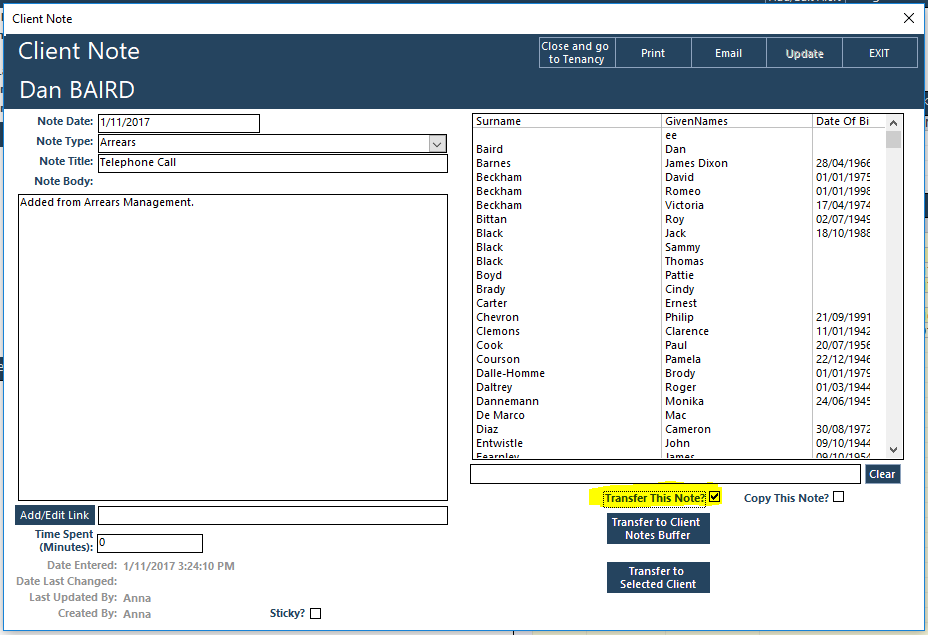
Transferring a Note to another Client
If a Note is entered on the wrong Client record, you are able to transfer the Note to the correct Client record.
From the Home Screen> Clients> Manage Clients> double click on the row of the Client, then double click on the Note you want to transfer to another Client. When the note is open, click the  box:
box:

Select the Client you want to transfer the note to from the large box containing the list of Client’ names. You can use the filter box at the bottom of the note to search for the surname of the Client you would like to transfer the note to:

Once you select the Client's name, the selected Client will be highlighted black. To transfer the note, click the Transfer to Selected Client box:

Your note will be transferred to the selected Client, with additional information about the transfer (EG ‘Transferred from client Smith, John’).
Viewing the Notes sent Client Notes Buffer Account
To view the Client Notes Buffer, from the Home Screen, click Audit and then click View Client Notes Buffer:

The Last Updated By column shows you which Chintaro User sent the Note to the Buffer Account.
If you would like to Print and Export the Client Notes Buffer data to use outside of Chintaro, click the corresponding button you require from the screen functions at the top of the screen:

Transferring a Note from the Buffer Account back to the Client Screen
Once a note has been transferred to the Buffer Account, it can't be transferred back to the Client's screen. You will need to copy the details of the note by copying and pasting and entering them back in to the Client screen manually.
Copying all Notes from one Client to another
Client Notes for a household in a Tenancy are recorded against the Primary Tenant only. At times, a Primary Tenant may change or leave a Tenancy, and take the history of the Tenancy with them. Chintaro includes a function to be able to copy all of the existing Client Notes from one Primary Tenant and transfer them to another Client to ensure the notes remain with the existing Primary Tenant.
To copy the notes from one Client to another, from the Home Screen, click Clients > Manage Clients> open the Client screen > Navigate to the Notes section > Click Copy Notes:
The Client Note Copy box will appear. Type the surname of the Client who you would like to copy the notes to in the search bar at the bottom of the window, then click their row to select their name. Once selected, click Copy: A pop up will appear to ensure you are copying the notes to the correct client. Click Yes to continue:
Deleting Notes copied by accident to another Client
If you have accidentally copied notes from one Client to another, you can remove the copied notes in bulk by opening the Client screen who had the notes copied to, navigating to the Notes section and clicking the Delete Copied Notes button:

A message will appear to confirm you would like to delete all copied Notes. Click Yes to continue: The copied notes will be removed from the Client screen.
Printing the Note History of a Client
To print a Client’s Note History, open their Client screen by clicking Client in the Toolbar at the top of the screen, then double click on the Client's name who you would like the note history for.
On the bottom right hand side of the screen, you'll see the Notes section for your Client:

Click the Print Note History button in the Notes section of the Client Record to see a print preview of their Note history:
Viewing all Client Notes created within Chintaro
The Client Notes screen (in the Clients menu) can be used for a variety of reasons. It can be used to view all of the Client Notes and Action Notes created in the system, but it can also be used as a reporting tool if you would like to report on certain types of notes.
An example of this may be that you may want to report on how many phone calls were received in the last quarter. Adding Client Notes with the Note Type of 'Phone Call' and filtering the Date column on the Client Notes screen will enable you to report on this data. Another example of using Note Types to report may be to see how many Arrears Actions were applied to Tenants in the last month.
The Client Notes screen can also be used to view and report on all Action Notes created for all Clients. This screen can be used to track which Action Notes have been completed, which are outstanding, and assign Actions to another Chintaro User.
To view all Client Notes and Action Notes created for all Clients in Chintaro, from the Home Screen, click Clients in the Main Menu, then click the Client Notes function from the Client’s Sub-Menu. The Client Notes screen will open:

Filtering the Client Notes screen to report on different Note Types
The Manage Client Notes screen will open showing all Active Notes created for all Clients in the system, but you can sort and filter this screen to find specific information.
If you are looking for Notes created within a period of time, click the black arrow in the Note Date column heading, go down to date filters, and select the filter you would like to apply (For example, 'This Month'):

Once the screen has been filtered to the dates you want to report on, you can filter other columns in the same way (click the black arrow in the column heading > use Text Filters EG Contains), for example, you may want to filter the Note Type column to show all Notes with a Note Type of 'Arrears':

Was this article helpful?
That’s Great!
Thank you for your feedback
Sorry! We couldn't be helpful
Thank you for your feedback
Feedback sent
We appreciate your effort and will try to fix the article