The email function on the Waiting List Screen is used to send a single email to a Client directly from Chintaro. The benefit of sending Clients emails through Chintaro is that the information you send will be recorded in the client's note history.
This solution details how to:
- Create and send an email to an individual Client on the Waiting List
- Create and send a bulk email to multiple Clients on the Waiting List
Create and send an email to an individual Client on the Waiting List
To send a single email to an individual Client on the Waiting List, go to the Waiting List screen by clicking Waiting List in the toolbar and double clicking on the row of the client you want to email.
You must have a valid email address in the Email field of the Client Screen to be able to send an email from Chintaro:

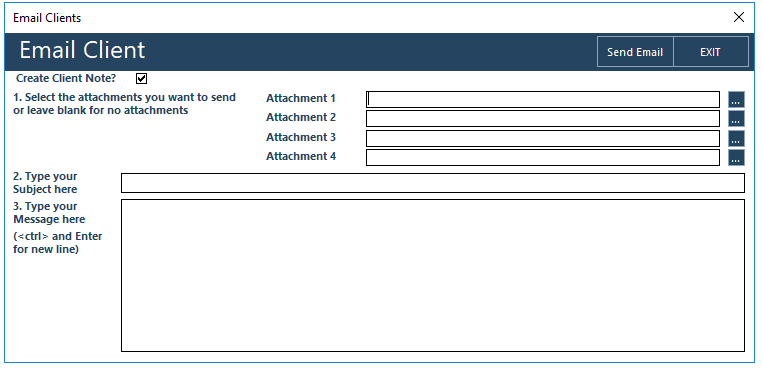
| Field | Description |
Create Client Note? | Ticking this box will automatically record a Client Note with the contents of the sent Email. This box can be ticked as a default through System Maintenance> Preferences> Tenancies Rent> Create Client Note |
Attachment 1- 4: | Clicking the ellipsis box will allow you to add attachments to your email. |
| Subject and Message | Enter as you would with any other Email. |
When you're ready, click the Send Email button and the email will show in your Outbox on your PC. You may get a message asking your approval to be sent and if so, your IT Department may be able to assist you to remove this warning. All replies will be sent to your desktop Email system.
Create and send a bulk email to multiple Clients on the Waiting List
To send a bulk email to your Clients, from the Home Screen, click Clients, then click Client Email and the Email Clients screen will open:

 button(s). You have the ability to add up to 4 attachments to the email.
Type the subject of the Email in the Subject field, and the contents of the Email in the Message field. NOTE: Hold down <CRTL> + K for a new line in the message field.
Tick the Create Client Note? box if you would like a Note to be created with the contents of the Email for the selected Clients, and if so, enter a brief description of the email in the Note Title field that will be appear in the Notes section of the Client Record.
Was this article helpful?
That’s Great!
Thank you for your feedback
Sorry! We couldn't be helpful
Thank you for your feedback
Feedback sent
We appreciate your effort and will try to fix the article