The Chintaro Access (Citrix) Installation Guide is designed to provide step by step instructions for installation of the Chintaro application.
Requirements for Chintaro
- Microsoft Access. Even though the Chintaro database will be on SQL Server, the Chintaro code (client) requires Microsoft Access 2007 or greater to be installed on each Client PC. If Access is not installed on your Client PC’s, you can use the Microsoft Access Runtime Version’ which is provided free of charge from Microsoft. Using Chintaro with the runtime version of Access limits the functionality of the search screens, and so the full version is recommended. Click here to download the Microsoft Access Runtime Version.
- Chintaro.mdb code database. Link provided in the instructions.
- Data folder. Chintaro Support will send this to you.
- Chintaro Shortcut and Icon. Attached to the bottom of this solution.
TABLE OF CONTENTS
- Requirements for Chintaro
- STEP 1: Install MS Access
- STEP 2: Download and configure the data folder
- STEP 3: Install the code database
- STEP 4: Configure the shortcut
- STEP 5: Adjust Trust Centre and Trusted Locations in Microsoft Access
- STEP 7: Configure Chintaro
- STEP 8: Setup users in Chintaro
STEP 1: Install MS Access
Ensure that Microsoft Access 2007 or greater has been installed on each virtual session. If these versions of Access are not installed on your virtual sessions you can use the Access 2010 “Runtime Version” which is provided free by Microsoft. Click here to download the free version of MS Access Runtime.
STEP 2: Download and configure the data folder
Chintaro needs a shared network location to store some files. These files include the databases, all of the templates and inspection files used by Chintaro. In the zip file you have been provided from Chintaro Support, there is a folder named ‘Data’. Copy this folder to your Shared Drive to create \\Servername\CHINTARO\Data. NOTE: Ensure that all users have FULL permissions to this folder. The contents of the data folder will appear as below.
STEP 3: Install the code database
It is important that each instance of your virtual desktops run their own copy of the Chintaro code database (chintaro.mdb). It is recommended that you install chintaro.mdb in the \Users\%username% structure. Create a folder called CHINTARO beneath the %username%\documents folder (\users\%username%\documents\CHINTARO). Download the chintaro.mdb file from this link, and also download the zipped file called 'ChintaroShortcut&Icon.zip' from the bottom of this Solution. Copy the 3 files that you just downloaded the \users\%username%\documents\CHINTARO folder.

STEP 4: Configure the shortcut
You will need to configure the shortcut to reflect your setup. To do this right-click on the Shortcut File and choose Properties. You will see the following pop up: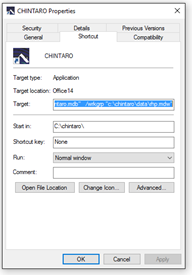
Ensure that the Target: field references “\users\%username%\CHINTARO\chintaro.mdb" /wrkgrp "Z:\chintaro\data\rhp.mdw", where the users structure matches yours, and Z: is the designated letter of your shared drive (where you installed the Database files earlier). You can also make sure the shortcut is using the Chintaro icon here, by choosing the Change Icon button and navigating to the C:\CHINTARO\CHINTARO.ico file. You can now copy the shortcut file to the desktop folder so that the Chintaro shortcut is visible to the user on their desktop.
STEP 5: Adjust Trust Centre and Trusted Locations in Microsoft Access
To run Chintaro, macros need to be enabled in Access. These are set in the Access Trust Center. Before running Chintaro, the Microsoft Access Trust Center Settings on each PC have to be adjusted in order to allow Chintaro to run properly.
NOTE: If you are using Access Runtime, you do not need to change the Trust Center Settings. For how to do this, please see this link: Adjusting the Trust Center and Trusted Location settings in Access
If you do not adjust the Trust Center and Trusted locations in Access, you will see these errors every time that you log into Chintaro:


STEP 6: Log in to Chintaro
To start Chintaro, simply double click on the house shortcut  on your desktop. If you are the first person to use Chintaro, you can use the username of sa with a password of sa (without the italics, of course!). You have now logged in as the System Administrator. If you have set up the system correctly, you will see the following log on prompt:

You will now see the Chintaro Home Screen:

STEP 7: Configure Chintaro
Updating the system preferences associated with changing your Organisation’s details, can be done from the Chintaro Home Screen then a single click on System Maintenance. From the System Maintenance Menu, single click on Preferences, and the following screen will appear:

NOTE: As you click your cursor in any field, you will get a clue as to what effect this has on the behaviour of the system. EG:

Enter the following information in the appropriate field:

NOTE: The State/Country field is very important – this field will determine how some screens look and which screens you have available
STEP 8: Setup users in Chintaro
As you have logged into Chintaro with the System Administrator credentials, you will now need to add a username and password for each user so that they can also log into Chintaro. Instructions for adding new users can be found here:
Add a new Chintaro user to the system. NOTE: All usernames and passwords are case sensitive so be sure that you don’t have ‘Caps Lock’ on or you may receive an error.
If you require further assistance from Chintaro Support
Please raise a ticket with Chintaro Support by emailing support@chintaro.com.au if you would like further assistance.
Was this article helpful?
That’s Great!
Thank you for your feedback
Sorry! We couldn't be helpful
Thank you for your feedback
Feedback sent
We appreciate your effort and will try to fix the article